

This is a short guide on how to use contact form 7 on WordPress in less than 5minutes. Contact Form 7 is one of the best free contact WordPress plugin you can ever find.
In this article, you will know:
- Features of Contact Form 7
- How to integrate contact form 7 on your WordPress site
- How to make contact form 7 works on your WordPress website
- Contact form 7 mail settings
- How to customize contact form 7 in WordPress
- How to use contact form 7 with Gutenberg/Block Editor
Let’s get started!
What is Contact Form 7?
Contact form 7 is a free WordPress plugin you can use to get your website visitors to contact you. They fill out the form and submit it and you get the mail in your inbox immediately.
Features of Contact Form 7
Contact form 7 looks simple but it has some features you can enjoy if you want to do more than just collecting visitors’ feedback on your WordPress website. The features of the contact form 7 plugin are:
- Brevo integration
- reCAPTCHA (v3) integration
- Constant Contact integration
- Stripe integration
- Spam filtering with Akismet
- Developers can extend by using external/custom functions with it either to connect to an API or perform an operation.
- Tracking form submissions with Google Analytics
- And lots more.
These features set Contact Form7 aside from some other contact form plugins. Don’t forget, Contact form7 is free for you to use.
Contact form7 doesn’t work on your website? Here is how to make it work
For contact form7 to work perfectly on your WordPress website, you need to set it up and try as much as possible to use your business email e.g info@example.com. I figured using Gmail with it end up dropping the mails in the Gmail spam folder.
Follow the steps below to set up Contact Form 7 Plugin on your WordPress site.
1). If you haven’t done so already, install Contact form 7 plugin and activate it.
2). Navigate to the Plugin on your Dashboard and click on Contact Forms to see the default form created.
3). Click on Edit (to edit the form) or create a new form (depending on what you want to use it for).
4). Explore the interface to get acquainted.
WATCH THE VIDEO GUIDE HERE: https://vimeo.com/906880981/d9e521c776
5). To create more fields (or new fields), click on the form tag (depending on the field you want to create), it will pop up and be sure it is inside the <label></label> tag.
6). When it pops up, fill it out accordingly and click on Insert tag.

7). Save the form and go to the Messages tab and fill it out as you want.
8). For contact form7 mail settings, see the guide below.
For more information on how to set up Contact form 7 form tags, read this documenttion from the developer.
Contact form7 mail setting
To do the mail settings for contact form 7, check the screenshot below or visit Contact form 7 doc for more information.
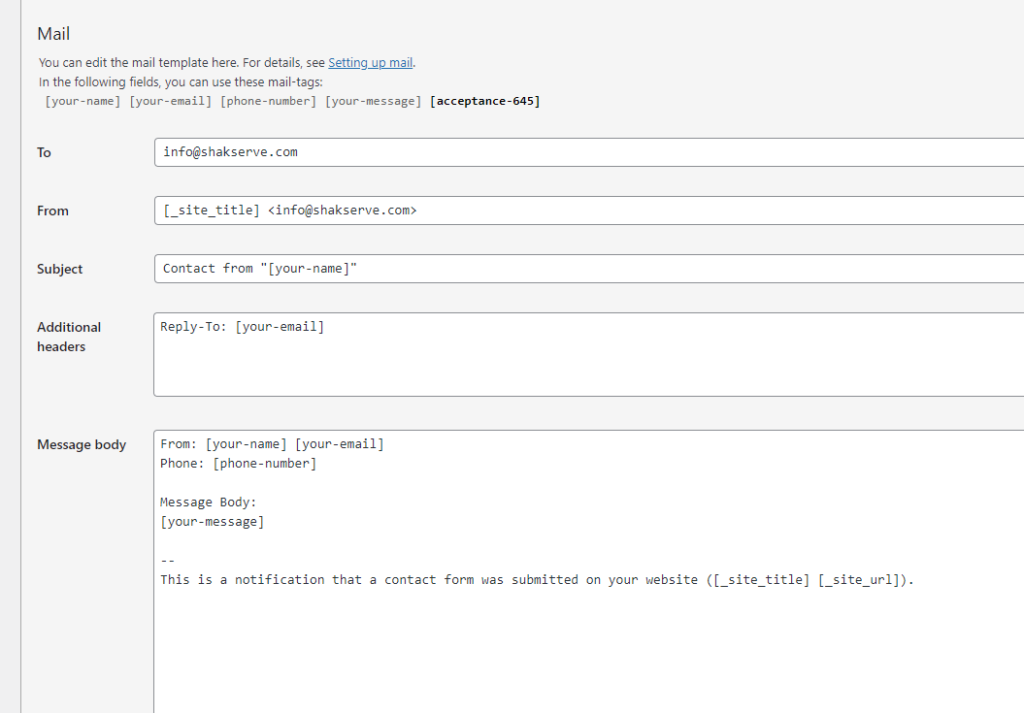
In the screenshot above,
- To: Is the email you want to receive the contact into. If it’s Gmail you choose to use, it will be like that but I recommend your business email.
- From: Your website name and your email that the senders will see when you reply to them
- Subject: Is the title of the email you will receive. This is because I did not use the subject field
- Message: Contains the details of the email.
How to use the contact form7 with Gutenberg/Block Editor
This is simple.
- Create the form as explained above
- Copy the contact form7 shortcode
- Go to the appropriate section on your site editor or page
- Use the shortcode block and paste the contact form 7 shortcode you copied in step 2.
- Save and preview the form.
- Not okay with the styling, you can then go ahead to style it to look the way you want.
Do you need help setting up Contact Form 7 plugin on your website? Use the comment box and I’d be glad to assist you.


Leave a Reply